
Graduation brownies ideas
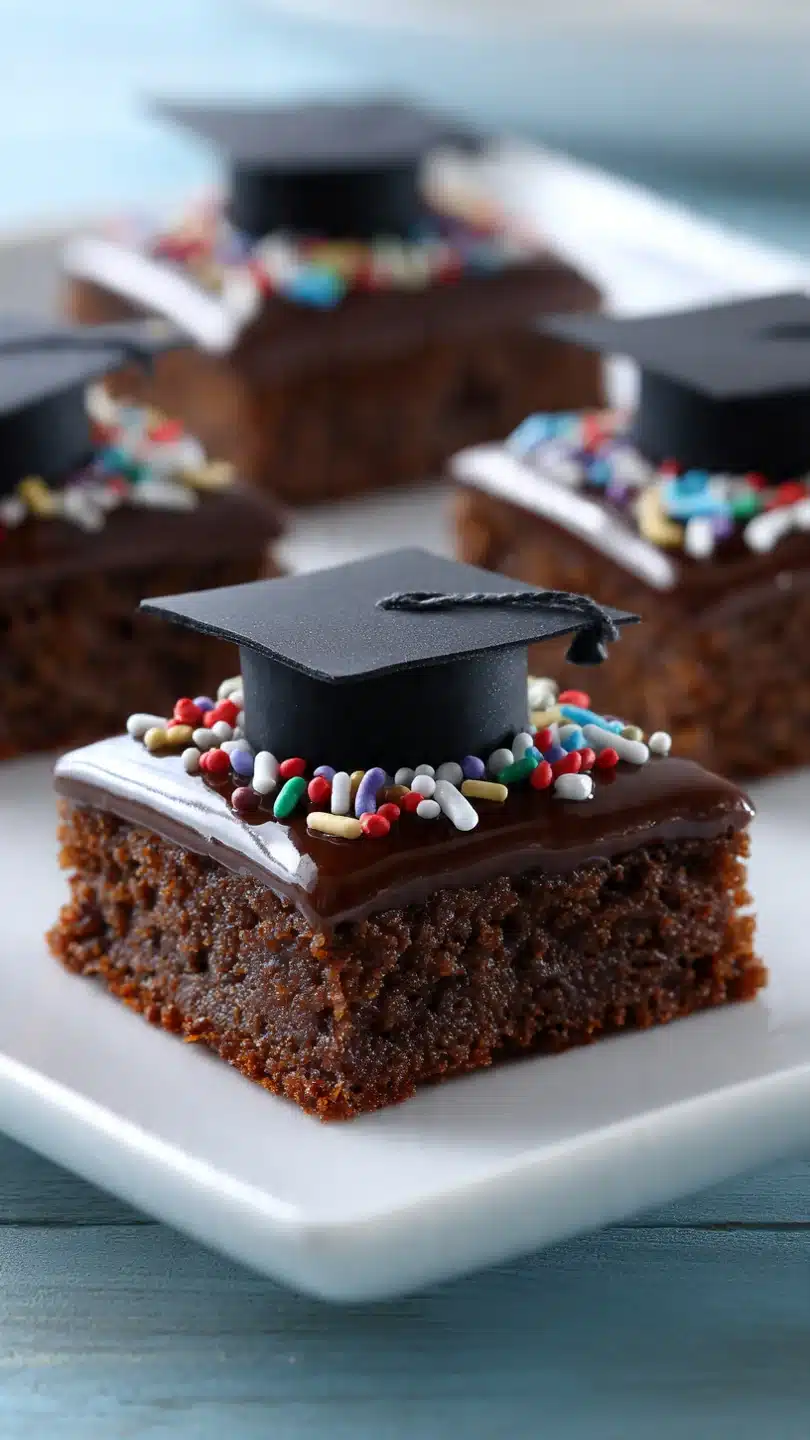
Brownies are the ultimate party dessert: universally loved, easy to make in big batches, and incredibly forgiving. For a graduation celebration, they offer a sweet, shareable canvas you can customize to honor the graduate in style. Forget dry sheet cake—imagine a platter of rich, fudgy squares topped with edible mortar boards, school color sprinkles, or a simple, elegant drizzle of gold.
As a chef who has catered countless milestone events, I know the secret to a stress-free dessert table is a reliable base recipe and clever, do-ahead decorations. Let’s create a graduation dessert that tastes as incredible as it looks, leaving you more time to celebrate.
- The Perfect Party Dessert: One batch yields 24 generous servings, making it ideal for feeding a crowd without last-minute fuss.
- Make-Ahead Magic: The brownie base can be baked, cooled, and frozen weeks in advance. Decorating can be done the day before.
- Endlessly Customizable: From classic frosted squares to elaborate themed toppers, this single recipe adapts to any school colors or graduate’s personality.
- Foolproof Texture: My tested formula guarantees a dense, chewy, and fudgy crumb every time—no cakey disappointments here.
- Minimal Equipment: You likely have everything you need already: one bowl, a whisk, and a standard baking pan.
Ingredients You’ll Need
Let’s gather our ingredients for the classic fudge brownie base. This recipe uses pantry staples to create a rich, chocolatey canvas that’s sturdy enough for frosting and decorations. Using quality cocoa powder is my non-negotiable tip for deep flavor.
- Unsalted butter: Melted butter gives these brownies their dense, fudgy texture and that signature shiny, crackled top.
- Granulated sugar: Provides sweetness and, when whisked with the melted butter, helps create that desirable crinkly crust.
- Eggs: Use large eggs at room temperature. They bind the batter and contribute to the chewy structure.
- Vanilla extract: Pure vanilla enhances the chocolate flavor. Believe me, it makes a noticeable difference.
- All-purpose flour: Just enough to provide structure without making the brownies cakey. Be sure to spoon and level it for accuracy.
- Unsweetened cocoa powder: This is where the flavor lives. I prefer natural cocoa for a more intense chocolate punch, but Dutch-processed works too.
- Salt: A must to balance the sweetness and make the chocolate flavor pop.
- Semi-sweet chocolate chips: Folded into the batter, they create molten pockets of chocolate. You can use chopped chocolate bars for a more decadent feel.

Note: You’ll find the complete list of ingredients, along with their exact measurements, in the printable recipe card at the bottom of this post.
Kitchen Equipment Needed
You don’t need any specialty tools. A 9×13-inch metal baking pan is essential for proper baking time and texture. Parchment paper with an overhang is your best friend for flawless removal and clean cutting.
A large mixing bowl, a whisk, and a rubber spatula are all you need for the batter. Finally, a sharp chef’s knife and a wire cooling rack will ensure you get picture-perfect squares.
How to Make Classic Fudge Brownies Recipe
Step 1: Combine the Wet Ingredients
Preheat your oven to 350°F (175°C) and line your pan with parchment paper. In your large bowl, whisk the melted, slightly cooled butter and granulated sugar vigorously for about a full minute. This step is key for dissolving the sugar and creating that glossy, crackly top.
Whisk in the eggs one at a time until fully incorporated, then stir in the vanilla. Your mixture should be smooth, thick, and shiny.
Step 2: Gently Fold in the Dry Ingredients
Sift the flour, cocoa powder, and salt directly over the wet ingredients. Sifting prevents lumps and ensures even distribution. Tip from me: use a rubber spatula to gently fold the dry ingredients into the wet.
Stop folding when just a few streaks of flour remain—overmixing is the enemy of fudgy brownies. Now, fold in the chocolate chips until they’re evenly scattered throughout the batter.
Step 3: Bake to Perfection
Pour the thick, luxurious batter into your prepared pan and spread it into a perfectly even layer. Bake for 28 to 32 minutes. Start checking at 28 minutes.
The brownies are done when a toothpick inserted into the center comes out with a few moist crumbs clinging to it. If you see wet batter, bake for 2 more minutes. The top will be shiny and beautifully cracked.
Step 4: The Crucial Cool Down
This is the hardest part: patience. Place the entire pan on a wire rack and let the brownies cool completely, which takes about 2 hours. For the absolute cleanest cuts, I recommend chilling the pan in the refrigerator for 1-2 hours after it reaches room temperature.
This firms up the butter and chocolate, allowing you to cut without any crumbles.
Step 5: Cut and Prepare Your Canvas
Use the parchment paper overhang to lift the entire brownie slab out of the pan and onto a cutting board. With a large, sharp knife, cut into your desired squares. Wipe the blade clean with a damp cloth between each cut for professional, crumb-free edges.
Now, step back and admire your perfect, ready-to-decorate foundation.
- Temperature is Key: Use room temperature eggs. Cold eggs can cause the melted butter to seize, resulting in a greasy batter. If you forget, place the eggs in a bowl of warm water for 5 minutes.
- The Toothpick Test: For fudgy brownies, you want moist crumbs on the toothpick, not a clean one. A clean toothpick means you’ve overbaked into cakey territory.
- Cutting Clean Squares: A hot knife doesn’t work for dense brownies. A cold, sharp knife and a firm, straight-down press is the professional method. Chilling the brownies first is the ultimate secret.
- Storage for Freshness: Store undecorated brownies in an airtight container at room temperature for up to 3 days. For longer storage, wrap the whole slab tightly in plastic wrap and freeze for up to 2 months.
Recipe Variations & Customizations
Here are five tested graduation-themed variations starting from our classic base. Each one creates a completely different presentation.
- Cookie Dough Layer: Spread 2 cups of edible eggless cookie dough over the cooled brownie slab. Top with a layer of chocolate ganache and sprinkle with mini chocolate chips in school colors.
- S’mores Graduation: After baking, top warm brownies with mini marshmallows and broil for 30-60 seconds until toasted. Drizzle with melted chocolate and crumble graham crackers over the top.
- Peanut Butter Swirl: Before baking, drop 1 cup of warm peanut butter in dollops over the batter. Use a knife to swirl it dramatically. Sprinkle with chopped peanuts after baking.
- Salted Caramel Pretzel: After cooling, drizzle the brownies generously with thick salted caramel sauce. Press broken pretzel sticks around the edges to create a “frame” and sprinkle with flaky sea salt.
- Black & White Tuxedo: Frost half of each brownie square with vanilla buttercream and the other half with chocolate buttercream. Use a licorice lace to create a “bow tie” on top.
What to Serve With Graduation Brownies
Create a stunning dessert bar by offering a variety of toppings and accompaniments. Set up a brownie sundae station with vanilla ice cream, hot fudge, whipped cream, and cherries. For a refreshing contrast, serve with fresh berry skewers or citrus-infused whipped cream.
Beverage pairings are easy: offer cold milk, iced coffee, or sparkling lemonade. For an adult gathering, a dark roast coffee or a glass of port wine complements the rich chocolate beautifully. Arrange the brownies on tiered stands for visual impact and easy serving.
Storage & Make-Ahead Instructions
- Make-Ahead Brownies: The brownie slab can be baked, cooled, wrapped tightly in plastic wrap, and frozen for up to 2 months. Thaw overnight in the refrigerator before decorating and serving.
- Frosted/Decorated Brownies: Store in a single layer in an airtight container at room temperature for 1 day. If using perishable frostings like cream cheese, refrigerate for up to 3 days.
- Freezing Decorated Brownies: Freeze undecorated brownies only. Frostings and delicate toppers do not freeze and thaw well for presentation.
- Reviving Brownies: If brownies seem dry, place a piece of bread in the container with them overnight; the brownies will absorb moisture from the bread.
Frequently Asked Questions
Q: Can I make these brownies gluten-free?
Yes. Substitute the all-purpose flour with a 1:1 gluten-free baking blend. I recommend brands like Bob’s Red Mill or King Arthur for reliable results.
The texture will be slightly more crumbly but still delicious.
Q: How far in advance can I decorate them?
For buttercream or ganache frosting, you can decorate 24 hours in advance. Store in a cool, dry place. Add fresh fruit or candy toppers just a few hours before serving to prevent sogginess or melting.
Q: My brownies are too cakey. What happened?
This usually means you overmixed the batter after adding the flour, or you baked them too long. Next time, fold just until combined and use the moist crumb toothpick test.
Q: Can I double this recipe?
Absolutely. Double all ingredients and bake in two 9×13-inch pans. Do not try to bake a double batch in one larger pan, as the center will not bake through properly.
Q: What’s the best way to create mortar board toppers?
Use a small square of chocolate (a Hershey’s bar piece works) as the base. Top it with a peanut butter cup or a Rolo. Use a dot of frosting to attach a fruit leather or licorice “tassel.”
Q: How do I get my frosting school colors?
Use gel food coloring, not liquid. Liquid coloring can thin your frosting. Add color gradually with a toothpick until you achieve the perfect shade.
Q: Can I use a box mix instead?
You can for a time crunch. Choose a fudge-style mix and prepare according to package directions for a 9×13 pan. My from-scratch recipe offers superior flavor and texture, but a quality box mix is a solid plan B.
Final Thoughts
Celebrating a graduate is about honoring their achievement with joy and ease. These brownie recipes give you a dependable, crowd-pleasing foundation and the creative freedom to make a dessert that feels personal and special. The real graduation gift is spending less time in the kitchen and more time sharing proud moments with your graduate.
I hope these ideas inspire you to create a sweet finish to a monumental day. If you try any of these variations, I’d love to see your creations! Tag me on social media or leave a comment below.
Congratulations to your graduate
Classic Fudge Brownie Base
Ingredients
Equipment
Method
- Preheat oven to 350°F (175°C). Line a 9×13-inch baking pan with parchment paper, leaving an overhang on two sides for easy removal. In a large bowl, whisk together the melted butter and sugar until well combined, about 1 minute. Whisk in the eggs, one at a time, then the vanilla. The mixture should be smooth and glossy.
- Sift the flour, cocoa powder, and salt directly into the wet ingredients. Use a rubber spatula to fold gently until just a few streaks of flour remain. Trust me, overmixing leads to tough brownies. Fold in the chocolate chips until evenly distributed.
- Pour the thick batter into the prepared pan and spread into an even layer with your spatula. Bake for 28-32 minutes. The brownies are done when a toothpick inserted into the center comes out with a few moist crumbs attached, not wet batter. The top will be shiny and cracked.
- Let the brownies cool completely in the pan set on a wire rack. This is crucial for clean cutting. For the neatest squares, chill the pan in the refrigerator for 1-2 hours before using the parchment overhang to lift the entire slab out onto a cutting board.
- Use a large, sharp chef’s knife to cut into squares. Wipe the knife clean with a damp cloth between cuts for pristine edges. Now, your perfect canvas is ready for decorating!


